Google+

contact us

Use the form on the right to contact us.

Day or Night, we are here to serve you. Leave your plumbing problem to us.


Tinley Park, IL

(708)845-7922

Residential and Commercial plumbers and plumbing contractors available in Orland Park, Tinley Park, Oak Lawn, Palos Heights, Midlothian, Oak Forest, Homer Glen, Mokena, Frankfort, and the surrounding Chicago South Suburbs. Emergency plumbers.

copper water lines.jpg

Kevin Szabo Jr Plumbing Blog

Kevin Szabo Jr Plumbing is Tinley Park, Orland Park, Oak Forest, Midlothian, Orland Hill, Homer Glen, Mokena, Frankfort, Crestwood, Palos Heights, Oak Lawn, local plumber. Read our blog for advice, tips, a good laugh, and basic home improvement.

**We are moving our old blog to our new and improved website. Too see all our posts visit kevinszabojrplumbing.blogspot.com

Filtering by Category: May

Why is There Sewage Coming Up Through the Bathtub

RH Business Marketing Solutions

If you've ever experienced sewage coming up through your bathtub drain, you know just how unpleasant and alarming it can be. Unfortunately, this is a common problem that can be caused by a variety of factors. In this article, we'll discuss some of the possible reasons why sewage may be coming up through the bathtub drain and what you can do about it.

  1. A clogged sewer line: One of the most common reasons why sewage may be coming up through the bathtub drain is a clogged sewer line. This can happen when materials like grease, food, hair, and other debris build up in the sewer line, preventing wastewater from flowing freely. As a result, sewage may back up into your home and come up through the bathtub drain.

  2. A blocked drainpipe: Another possible cause of sewage coming up through the bathtub drain is a blocked drainpipe. This can happen if there is a blockage in the plumbing system, such as a clogged pipe or tree roots that have infiltrated the pipes. If the blockage is severe enough, sewage may be forced back up through the bathtub drain.

  3. A damaged sewer line: Sewer lines can become damaged due to age, tree roots, or other factors. When this happens, wastewater may leak out of the pipes and into your home, causing sewage to come up through the bathtub drain.

  4. A malfunctioning septic system: If you have a septic system, a malfunctioning system can cause sewage to back up into your home. This can be caused by a variety of factors, including a full septic tank, a clogged drain field, or a damaged septic system.

  5. A problem with the bathtub's plumbing: In some cases, the problem may be with the bathtub's plumbing rather than the sewer line or septic system. For example, a blockage in the bathtub's drainpipe may cause wastewater to back up into the bathtub.

If you're experiencing sewage coming up through your bathtub drain, it's important to address the problem as soon as possible. Not only is this issue unpleasant, but it can also pose a health risk to you and your family. To address the problem, you may need to call a professional plumber or septic service company to inspect your plumbing and septic system. They can diagnose the issue and recommend the best course of action to fix it.

In some cases, the problem may be as simple as clearing a clogged drainpipe or removing a blockage from the sewer line. In other cases, more extensive repairs may be necessary, such as replacing damaged pipes or repairing a malfunctioning septic system. Whatever the cause of the problem, it's important to take action quickly to prevent further damage and restore your plumbing system to full functionality.

Joinery Mastery: Unlocking the Secrets to Creating Strong, Beautiful Wood Joints

RH Business Marketing Solutions

Mastering joinery is an essential skill for any woodworker, as it forms the foundation of creating strong and beautiful wood pieces. With various types of wood joints available, each with its own strengths and weaknesses, it is crucial to understand the principles of joinery and select the right joint for the job. This article will guide you through the world of joinery, providing you with the knowledge and techniques required to create long-lasting, visually appealing wood projects.

1. Understanding Wood Joints

To create strong and beautiful wood joints, it is crucial to understand the basic principles of joinery. This includes the importance of selecting the right joint for the job, as well as the role of wood grain, moisture content, and wood movement in joinery. By understanding these principles, you can ensure that your wood projects are both structurally sound and visually appealing. 

2. Types of Wood Joints

There are many different types of wood joints, each with its own strengths and weaknesses. Some common wood joints include:

  • Butt joints: A simple joint where two pieces of wood are joined end-to-end. While easy to create, butt joints are not very strong and may require reinforcement.

  • Mitre joints: Similar to butt joints, but the ends of the wood pieces are cut at a 45-degree angle, creating a more aesthetically pleasing joint. However, mitre joints also lack strength and often require reinforcement.

  • Dovetail joints: A more complex joint with interlocking pins and tails, providing both strength and visual appeal. Dovetail joints are commonly used in drawer construction and other areas where strength is required.

  • Mortise and tenon joints: A strong and versatile joint, consisting of a tenon (a protruding piece of wood) that fits into a mortise (a corresponding hole in another piece of wood). Mortise and tenon joints are often used in furniture construction.

  • Lap joints: A joint where one piece of wood overlaps another, providing a stronger connection than a simple butt joint.

  • Finger joints: Also known as box joints, finger joints are created by cutting a series of interlocking fingers into the ends of two pieces of wood. This joint is strong and visually appealing, making it popular for box and drawer construction.

When selecting the appropriate joint for your project, consider factors such as strength, appearance, and ease of construction.

3. Joinery Tools and Techniques

To create strong and beautiful wood joints, you will need a variety of tools, such as saws, chisels, and planes. Specialized joinery tools, such as dovetail jigs and dowelling jigs, can also be helpful for creating precise joints. When using these tools, it is essential to practice safe and effective techniques, such as proper cutting, shaping, and fitting of wood joints.

4. Glues, Fasteners, and Reinforcements

Adhesives, such as wood glue, play a crucial role in joinery, helping to create strong and long-lasting connections between wood pieces. Various types of wood glue are available, each with its own strengths and weaknesses, so it is important to select the appropriate adhesive for your project. In addition to glue, fasteners such as screws and nails can be used in wood joinery, as well as reinforcement methods such as dowels, biscuits, and splines.

5. Achieving Beautiful and Strong Joints

To create visually appealing wood joints, consider factors such as wood selection and grain matching. Techniques such as proper clamping and glue application can also help ensure strong joints. Finally, sanding and finishing are crucial steps in creating professional-looking wood joints.

6. Troubleshooting Common Joinery Issues

Common joinery problems, such as gaps, misaligned parts, and weak joints, can often be identified and addressed with careful observation and practice. Tips for repairing or reinforcing problematic joints can help you improve your joinery skills and create better wood projects.

7. Conclusion

Mastering joinery is essential for creating strong, beautiful wood pieces that will last for years to come. By understanding the principles of joinery, selecting the right joint for the job, and practicing proper techniques, you can achieve joinery mastery and create lasting, visually appealing wood projects. So, continue learning and practicing joinery techniques, and unlock the secrets to creating strong, beautiful wood joints.

Guest Contributor: Kristin Annie

How to Transform Your Patio and Balcony for Year-Round Use

RH Business Marketing Solutions

A patio or balcony is the perfect place to be in the summer, but during winter, it becomes another unused space on your property – until now. If you want to get more use out of your full property, including the outdoor spaces, then you'll need to upgrade what you have. With these easy fixes, you can enjoy your patio or balcony year-round:

Add Beautiful but Functional Windbreakers

One of the main issues with outdoor spaces is the wind, which can make it feel much colder than it actually is. Consider adding attractive but functional windbreakers to your patio or balcony to combat this. Natural options include a trellis covered in climbing plants or elegant privacy screens. However, if you have a stunning view that you don't want to obstruct, you'll want some glass windbreaks. These are essentially glass fences that can be extended vertically to block out the wind.  

Include Beautiful Heaters to Keep Things Cozy Year-Round

Even with windbreakers in place, it can still get chilly outside during the cooler months. Adding a heater to your outdoor space is a great way to extend the use of your patio or balcony into the fall and winter. You can choose freestanding propane heaters, wall-mounted electric units, or even install a natural outdoor fireplace. This heater will need to be either sit center of your patio or, alternatively, around your furniture to create a cozy environment. Regardless of what option you choose, always follow safety guidelines.

Make Sure Your Furniture is Weatherproofed

If you're going to be spending time outside year-round, you'll need furniture that can stand up to the elements. Look for outdoor furniture made from materials like plastic, tough-wearing woods, or metal that are naturally resistant to moisture and insects. If you already have furniture that you love but that isn't weatherproof, consider applying a waterproof sealant to protect it from the elements. You can also invest in outdoor furniture covers to help protect your furniture from the elements when it's not in use.

Add a Roof or Clear Tarp Overhead

If your patio or balcony is completely exposed to the elements, you might want to consider adding a roof or a clear tarp overhead. This will not only help keep rain and snow off of your furniture but also create a cozier, more intimate space. A pergola is a great option for a patio, as it provides some shade and protection without completely enclosing the space. A clear tarp can then be added to create a temporary waterproof roof that can be removed during the warmer months.

Protect Furnishings in a Weather-Tight Storage Box

Even with the best windbreakers, heaters, and furniture, you'll still need a place to store everything when the weather gets really bad. A weather-tight storage box is a great solution for keeping your patio or balcony clean and clutter-free year-round, and it's particularly great if you have cushions you want to keep in good condition. Look for a box made from weather-resistant materials like resin or metal that can withstand the elements. If there's anything soft that you don't want to rot or get infested, opt for storage units with full sealing. A garden shed can then be used to store your gardening equipment and other low-priority items.

Tips For Giving Your Backyard A Makeover

RH Business Marketing Solutions

Giving your backyard a new lease on life is one of the most satisfying and rewarding projects you can set yourself when you want to make an improvement to your home.

The reasons for this are twofold. Firstly, working out in the open air is a fantastic way to reconnect with nature, de-stress from a busy, urban environment, and watch the fruits of your labor blossom. 

Unlike interior home improvement projects, backyard rejuvenation doesn’t negatively impact your daily life (unless you use your garden religiously). This means that you can complete the project at your own pace without becoming irritated or overwhelmed by the scale of the task.

The other reason why giving your backyard a makeover is satisfying is because it allows you to enjoy your outdoor space that bit more. Whether you are returfing your lawn to play soccer with your kids on or creating a decking area on which to enjoy barbeques with friends - there is no shortage of enjoyment you can derive from a backyard improvement project.

To help you get the most out of your backyard makeover, here are some top tips:

Install a retractable awning.

One of the best ways to improve your backyard is to ensure you can sit out in the garden during all weather conditions without an unpleasant experience. It doesn’t matter whether you live in the hottest part of the world with the sun beating down on you relentlessly or in a rainy and cloudy climate that can never make up its mind - you need to be prepared to take shelter from the weather when necessary.

This is why installing a retractable patio awning is such a useful addition to your backyard. It enables you to enjoy your garden no matter the weather conditions, which is an underrated benefit.

Consider the number of times you have had to retreat back indoors due to unbearable sunlight or miserable rain. It has severely limited your ability to use the garden, which is a great shame. Instead, with a retractable awning, you can sit underneath and enjoy a book, spend time with family and friends, or simply enjoy the weather from the safety of the cover.

Create a dedicated decking or patio area.

Another great addition to your backyard is a dedicated decking or patio area. This is because having a garden with nothing but grass can be impractical. While grass is beautiful to look at when it is properly maintained, it can be difficult to place tables, chairs, barbeques, and other items on - especially if you frequently get rain.

The grass will soon die or become muddy and sodden, quickly making your backyard unpleasant. Instead, by creating a decking or patio area, you can have a dedicated area for entertaining guests, cooking food, or just placing furniture and other heavy items. 

Lay new turf and flower beds

Finally, if your garden looks tired and sorry for itself, you should returf the space and plant fresh flower beds to rejuvenate your backyard. The great thing about returfing is that you can buy ready-grown turf, meaning it will look great from the moment you lay it - no waiting for it to grow.

Summer DIY Projects

RH Business Marketing Solutions

Summer is the perfect time to get creative and start some DIY projects that you've been dreaming about all year. Whether you want to improve your home, upgrade your garden, or simply have some fun, there are plenty of easy DIY projects you can try out. Here are some ideas for DIY summer projects that will keep you busy and engaged.

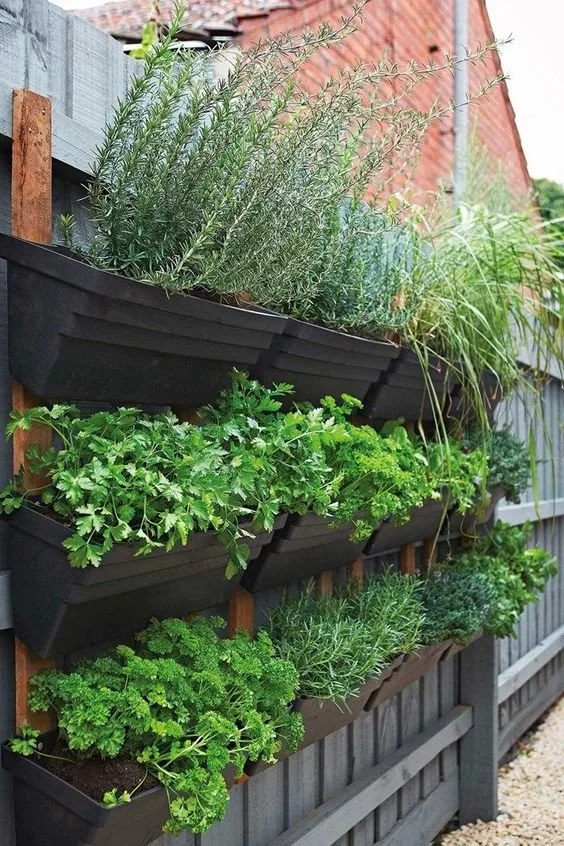
  • Create a Vertical Garden

Vertical gardens are a great way to add greenery to your home or apartment, even if you don't have much space. You can use a variety of containers, including old tin cans, mason jars, or wooden crates, and hang them on a wall or fence. You can then fill them with herbs, flowers, or succulents, and enjoy a mini garden right in your living space.

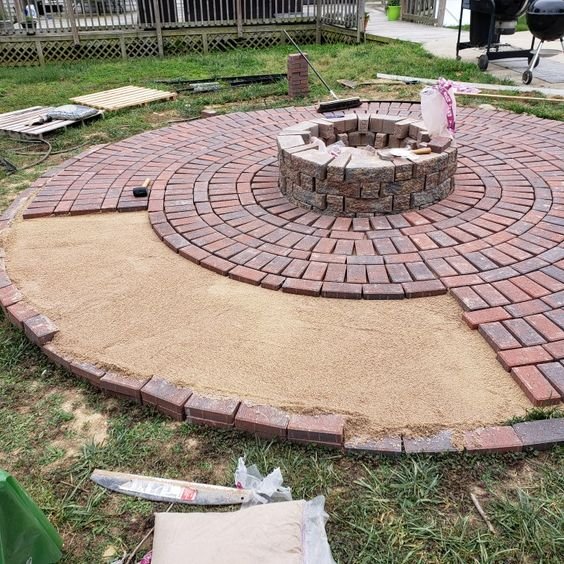
  • Build a Fire Pit

A fire pit is a perfect addition to any backyard, and it's a great project to tackle during the summer months. You can buy a fire pit kit at a home improvement store or build your own from bricks or pavers. Make sure to check local regulations and fire codes before starting this project.

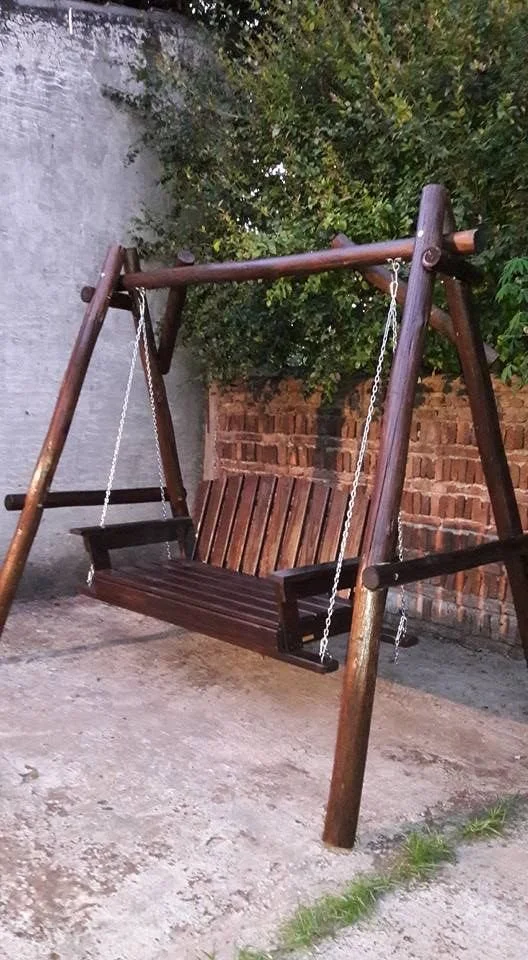
  • Create a Swing

If you have some old pallets lying around, you can easily turn them into a comfortable and stylish outdoor swing. You'll need a few tools and materials, including screws, rope, and cushions, but the end result is a cozy spot to relax and enjoy the warm weather.

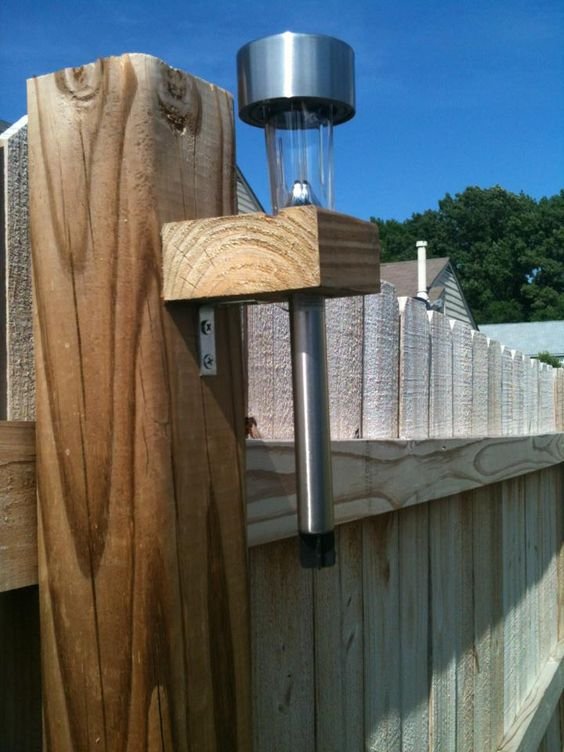
  • Make a Solar-Powered Outdoor Light

If you're looking for a sustainable and eco-friendly project, consider making your own solar-powered outdoor lights. You can use a variety of materials, including mason jars, wine bottles, or PVC pipes, and install solar-powered lights to create a unique and energy-efficient lighting solution for your yard or patio.

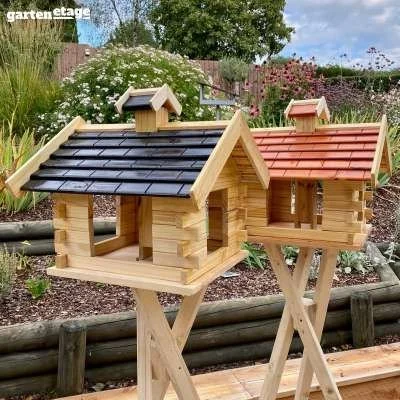
  • Build a Birdhouse

Creating a birdhouse is a fun and easy project that can be enjoyed by the whole family. You can use scrap wood, old license plates, or even teapots to create unique and colorful birdhouses. Hang them in your garden or backyard, and enjoy watching the birds as they come and go.

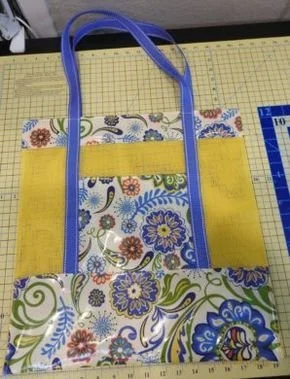
  • Design a Custom Beach Bag

If you're heading to the beach this summer, why not create your own custom beach bag? You can use fabric paint, tie-dye, stencils, or iron-on patches to decorate a plain canvas bag and make it uniquely yours. This is a great project to do with kids, and the finished product is both functional and stylish.

Summer is a great time to get outside and explore your creative side. With these DIY projects, you'll have plenty of fun and rewarding activities to keep you busy all season long. So grab your tools and get started on your next DIY adventure!

The Tragedy at Oak Forest Bowl

RH Business Marketing Solutions

On May 6th, 2023, Oak Forest Bowl, a beloved bowling alley located in Oak Forest, Illinois, was destroyed by a devastating fire. The incident has left the community in shock and mourning, as the bowling alley has been a staple of the area for over 50 years.

The cause of the fire is still under investigation, but initial reports suggest that it may have been caused by an electrical fault, and it appears that it started outside of the building.

The fire was reported in the early hours of the morning and quickly spread throughout the building. Firefighters arrived on the scene promptly, but the intensity of the blaze made it difficult to contain. Despite their efforts, the building was completely destroyed, and the roof collapsed shortly after their arrival. Fortunately, no one was injured in the fire, as the building was empty at the time.

The loss of Oak Forest Bowl is a devastating blow to the community. The bowling alley has been a gathering place for generations, and many people have fond memories of spending time there with friends and family. The building was also home to several leagues, which provided a sense of community for those who participated.

The community has also rallied around the owners, offering their support and condolences. Many have taken to social media to express their sadness and share their memories of the bowling alley. Some have even started fundraising efforts to help with the rebuilding process.

Other local businesses in the area have expressed their sadness and support by offering both part time and full time jobs to those who were employed at Oak Forest Bowl. A big thank you to Durbin's and Kenootz in Midlothian, At The Office in Crestwood, and Cooper's Bar and Grill in Oak Forest for making these jobs available for those who need it at this time.

The loss of Oak Forest Bowl is a tragedy for the community, but it is heartening to see the outpouring of support in the wake of the fire. The memories and friendships formed at the bowling alley will live on, and hopefully, one day soon, a new Oak Forest Bowl will rise from the ashes. Keith has always been there for the Oak Forest Community, we will be here for him when it’s time to rebuild!

Outdoor Pergola Hanging Daybed: The New Outdoor Staple

RH Business Marketing Solutions

An outdoor pergola hanging daybed is the perfect addition to any backyard or garden space. It is a great way to create a cozy and relaxing outdoor retreat where you can enjoy the fresh air, sunshine, and beautiful scenery. With its unique design and functionality, a hanging daybed can serve as a versatile and comfortable seating option that can accommodate several people at once.

The pergola hanging daybed is essentially a combination of a traditional pergola and a daybed. The pergola provides a shaded outdoor space that protects you from the harsh sun while still allowing you to enjoy the fresh air and beautiful views. The daybed, on the other hand, is a comfortable and cozy seating option that allows you to recline and relax outdoors.

When combined, the result is a beautiful and functional outdoor seating area that is perfect for entertaining guests or simply lounging with a book or a refreshing drink. The pergola hanging daybed typically features a sturdy wooden frame that supports the hanging daybed and a canopy or roof to provide shade and protection from the elements.

One of the key benefits of a pergola hanging daybed is its versatility. It can be used for a wide range of activities, such as reading, napping, sunbathing, or enjoying a meal with friends and family. The spacious design allows multiple people to relax together comfortably, making it a great option for social gatherings or family time.

In addition to its functionality, a pergola hanging daybed can also add a unique and stylish touch to your outdoor space. The wooden frame and canopy provide a natural and rustic look that complements the beauty of your garden or backyard. You can also add cushions, blankets, and decorative pillows to customize the look and feel of the daybed to match your personal style and preferences.

When it comes to maintaining a pergola hanging daybed, there are a few things to keep in mind. Regular cleaning is essential to keep the daybed looking its best and prevent any damage or wear and tear. You should also check the stability and durability of the frame and canopy periodically to ensure that it is secure and safe to use.

In conclusion, a pergola hanging daybed is a beautiful and functional addition to any outdoor space. It offers a comfortable and versatile seating option that can accommodate multiple people, making it perfect for social gatherings or family time. With its natural and rustic look, it can also add a stylish touch to your garden or backyard. So why not create your own outdoor retreat with a pergola hanging daybed today?

The 5 Things No One Tell You About Moving into Your First Home

RH Business Marketing Solutions

Unless you’re one of the rare breeds who are born in the family home and stay in it once your parents pass, then chances are you’re going to move home at least once in your life! Whether you’re moving with your partner, kids, friends, or your own solo pad, getting the keys and moving into your first property can be a daunting affair.

You may have already scoured the web for tips and strategies for a seamless move day. However, there are certain things no one seems to tell you about the moving process that you need to know about! Knowledge is power, so reading the below will help prepare you for what awaits and get you ready for homeowner life.

It’s Never Too Early to Start

If there’s one key bit of advice we can give to first-time homeowners, it’s to give yourself plenty of time to pack, pack and pack some more! Don’t leave things till the last minute. If you’re the type of person who wings it, you will be doing yourself a disservice. There are so many duties to undertake before you get the keys to your first home. If you’ve got time on your hands and you’re twiddling your thumbs, put it to good use and start packing now!

Prepare for Stress and Anxiety

While some of your loved ones may have hinted there’s a bit of stress involved in moving house, you need to be prepared for a lot more of it than they’re letting on! This isn’t to scare you either. While moving into your first home is incredibly exciting, because there are so many tasks to complete in advance, stress and anxiety levels are bound to skyrocket. Just try and keep your cool and focus on the end game. If things are getting too much, try out some deep breathing exercises to calm you down.

You Have More Belongings Than You Think

Whenever someone moves into their first property, they tend to underestimate just how much stuff they have! If you’re worried you’re not going to be able to fill your home up, trust us, you will! You’ll be amazed at how many belongings you have. Once you get packing, if you find the boxes are mounting up to the ceiling, why not look into storing them somewhere for the time being? This is where Safestore comes into the equation. They can house your personal belongings in a self-storage unit while you move into your first property.

Things Can and Do Go Wrong

It doesn’t matter how much planning and preparation you’ve done for the big move, things can and do go wrong. And guess what? It’s fine! There are bound to be some obstacles along the way, but we promise you’ll overcome them. Whether it’s the removal van not turning up on time or you’ve run out of masking tape for your boxes, try not to let your stress get the better of you.

Moving Will Be a Huge Disruption

Many of us lead hectic schedules. Whether you work long hours at the office, or your days are filled looking after the kids, the idea of moving into your first home may fill you with dread, especially when it comes to time constraints. As we’ve touched on, it’s wise to spend any spare minute you have getting ready for the big move. That way, you won’t have an endless list of tasks to do on move day.

We all know moving home isn’t easy. However, even those who go into their first move with their eyes wide open soon realise there are many things no one seems to let you know about in advance! To make the move into your first property as smooth as possible, learning about the potential issues above can help you prepare accordingly. Finally, all we have left to say is good luck on the move and enjoy your forever home!

Need Some Answers To A Septic Tank Issue? Common FAQs Answered

RH Business Marketing Solutions

If you have ever lived or stayed in a rural setting in the US, or parts of the UK, you will have likely used a septic tank. In 2023, these systems will be more sophisticated, and many homes are now choosing to have their septic tanks connected to their garbage disposal in the kitchen. However, while this is logical, it isn't always straightforward, and issues can occur. 

So, when it comes to troubleshooting issues with your septic tank or your connected garbage disposal, you will probably have a few questions. In this article, 5 FAQs about garbage disposal systems and septic tanks are answered.

Remember, if you need help immediately, call an emergency septic tank specialist!

Can A Waste Disposal Be Fitted With A Septic System?

Yes, you can use garbage disposal for septic systems, but it's important to use it properly and avoid putting certain types of waste down the drain.


Also, not all kinds of septic tanks are able to support a garbage disposal system. Indeed, most modern septic tank systems can support garbage disposal, but it's important to choose a disposal unit that is specifically designed for use with a septic system. It's also important to use the garbage disposal properly and avoid putting certain types of waste down the drain.


What Should I Avoid Putting Down the Garbage Disposal if I Have a Septic Tank?

You should avoid putting non-biodegradable materials, grease, oil, bones, eggshells, coffee grounds, and vegetable peels down the garbage disposal when you have a septic tank fitted.

It is also worth noting that your septic tank will drain from your bathroom too. So, while it isn't the garbage disposal, you will need to avoid flushing feminine hygiene products and nappies down the toilet, as well as wipes, as these can cause clogs and blockages in the system.


If I Use Garbage Disposal, Will My Septic Tank Need Pumping?

If you use garbage disposal regularly, you should have your septic tank pumped more frequently, typically every 2-3 years.

This may vary based on the model of the septic tank or garbage disposal.  


Can a Clogged Garbage Disposal Cause Problems With My Septic System?

Yes, a clogged garbage disposal can cause backups and clogs in your septic system, leading to potential damage and expensive repairs.

Some indicators of an issue with a septic tank to keep an eye out for include bad smells, poor drainage, a backup of food waste through your pipes and sinks, as well as issues with your yard or garden, such as the sudden appearance of soggy spots.

If you spot signs of clogged garbage disposal in your home, you need to call out a professional promptly to fix it.


Are There Any Types of Garbage Disposals That Are Better For Septic Tank Systems?

There are garbage disposals specifically designed for use with septic tank systems that use a bio-charge injection system to help break down waste and reduce strain on the septic system. It's recommended to use these types of disposals if you have a septic tank.

Creative Ideas for Wall Decor with Portraits

RH Business Marketing Solutions

Portraits have long been a popular choice for wall decor, offering a personal touch that reflects the people, pets, and memories that mean the most to you. However, finding unique and creative ways to display these treasured images can be a challenge. In this article, we'll explore some inventive ideas for wall decor with portraits, helping you transform your living space into a personalized and visually captivating gallery.

1. Create a Gallery Wall

Gallery walls are an excellent way to showcase a collection of portraits and other artwork in a cohesive and visually appealing manner. To create a gallery wall:

  • Select a variety of portrait sizes, shapes, and styles that complement each other.

  • Choose a layout that best fits your space, such as a grid, a symmetrical arrangement, or an eclectic, free-flowing design.

  • Use frames that share a common element, like color, material, or style, to create a sense of unity.

  • Mix in other types of wall art, like paintings, prints, or decorative objects, to add visual interest and variety.

2. Play with Scale

Using portraits of varying sizes can create a dynamic and engaging visual display. Consider mixing large, statement-making pieces with smaller, more subtle portraits to create depth and dimension on your walls. You can also experiment with different sizes of the same portrait to create a unique, eye-catching arrangement.

3. Opt for Unique Frames

The frames you choose for your portraits can make a significant impact on the overall aesthetic of your wall decor. Instead of sticking with traditional options, consider exploring unique and unconventional frames that showcase your personal style. For example, you could opt for vintage or antique frames, colorful or patterned designs, or even DIY options made from repurposed materials.

4. Incorporate Different Mediums

Portraits come in a variety of mediums, from traditional oil paintings and photographs to modern digital illustrations and mixed-media collages. Incorporating different mediums into your wall decor can add an artistic and eclectic touch to your space. For example, you might display a collection of cat portraits rendered in various styles and techniques, celebrating your feline friends through diverse artistic interpretations.

5. Use Portraits as Part of a Larger Theme

To create a cohesive and visually engaging wall decor, consider using portraits as part of a larger thematic display. This could involve arranging portraits around a specific subject matter, color palette, or artistic style, creating a curated and intentional presentation. For example, you might create a wall dedicated to travel memories, featuring portraits of loved ones taken during your various adventures, accompanied by maps, postcards, and other travel-related memorabilia.

6. Think Beyond the Wall

While wall decor is the most common way to display portraits, you can also think beyond the traditional hanging methods and incorporate them into other areas of your home. Some creative ideas include:

  • Arranging small portraits on a bookshelf or mantel, creating a unique and personal vignette.

  • Displaying portraits on easels or picture stands, adding an artistic touch to your tabletop or countertop decor.

  • Incorporating portraits into functional objects, like clocks, coat racks, or key holders, blending form and function in a personalized manner.

7. Combine Portraits with Typography

Typography can add a powerful and expressive element to your wall decor, especially when combined with portraits. Consider incorporating quotes, song lyrics, or personal messages that hold special meaning to you and your loved ones. You can achieve this by displaying framed text alongside your portraits or incorporating the text directly onto the images through digital editing or hand-painting techniques.

8. Experiment with Lighting

The way you illuminate your portraits can dramatically enhance their visual impact. Consider using different lighting techniques, like gallery-style picture lights, LED strip lights, or spotlights, to create a striking and dramatic effect. You can also experiment with ambient lighting, such as floor lamps or wall sconces, to highlight your portraits and create a warm, inviting atmosphere in your space.

9. Create a Multi-Layered Display

A multi-layered display can add depth and dimension to your wall decor, creating an eye-catching and dynamic presentation. To achieve this look, layer multiple portraits on top of each other, either in a symmetrical or asymmetrical arrangement. You can also use shelves, ledges, or picture rails to display your portraits in layers, offering a versatile and easily customizable option that allows you to change your display as your collection grows or your tastes evolve.

10. Design a Personalized Timeline

Celebrate your life's milestones and precious memories by creating a personalized timeline using portraits. Arrange your portraits chronologically, showcasing the significant moments, people, and experiences that have shaped your journey. This display can serve as a powerful visual narrative of your life and provide a unique conversation starter for guests.

11. Make a Bold Statement with a Mural

Transform your portraits into a larger-than-life mural for a truly unforgettable wall decor option. This can be achieved by enlarging a single portrait to cover an entire wall or by arranging multiple portraits together to create a cohesive and visually captivating scene. Murals can be created using traditional painting techniques, digital printing, or even removable wall decals, allowing you to choose the method that best suits your space and personal style.

In conclusion, there are countless creative ways to incorporate portraits into your wall decor, allowing you to express your individuality and celebrate the people, pets, and memories that mean the most to you. By experimenting with different display techniques, mediums, and styles, you can transform your living space into a personalized and visually engaging gallery that reflects your unique story. So, don't be afraid to think outside the box and explore the many possibilities that wall decor with portraits has to offer.